

Lethargy set bonus works even when you mix the set. The person who reported the finding only checked the plugin timers most likely, as it doesn't work with them (I knew this because I tested SCH gloves the other day, and figured I'd test RDM too).
My test, duration with lethargy feet +1 to the left and +2 to the right:
regen
6:42 to 6:54
haste
12:07 to 12:26
refresh
7:57 to 8:11
Sortie Release - Info

You must be logged in to do that.
Sortie Release - Info


Phoenix.Godofwars said: »
i was reading all these treads and my god you all still talking about A3/A4 wtf you can see the way it needs to be white dmg and magic kill not hard to do thats all you all talk about from page 1-46 move on lets talk more about B C D my god ppl who want to solo ***and cant cover your stuff then dont go in same as vagery omen and thing in this game i wanna go kill my self how much i see ppl talking about a3/a4
hey buddy, if you don't have anything constructive to say, there's the door. you don't have to be so rude.
[+]


Sehrahin said: »
Lethargy set bonus works even when you mix the set. The person who reported the finding only checked the plugin timers most likely, as it doesn't work with them (I knew this because I tested SCH gloves the other day, and figured I'd test RDM too).
My test, duration with lethargy feet +1 to the left and +2 to the right:
regen
6:42 to 6:54
haste
12:07 to 12:26
refresh
7:57 to 8:11
My test, duration with lethargy feet +1 to the left and +2 to the right:
regen
6:42 to 6:54
haste
12:07 to 12:26
refresh
7:57 to 8:11
ya the timer addon is definitely not gospel. lol
also, I discovered this morning that if your ruspix plate is fully charged, you have to get the new shiny ki from him rather than going to kamihr. idk if anyone said that yet.
[+]


So I'd like to post my groups finding and have been able to confirm with with 3 runs thus far working every time.
Chest #B3 and Casket #B1
We had a solo DD run straight to the Umbril's in the B sector right from the start of the run and kill them using 4 WS's and at least one light SC. We got both chests at the same time after the fifth kill.
Runs went as followed:
Run #1 Sam used Fudo > Kasha > Shoha > Fudo and killed 4/5 with Radiance and last one with melee hit
Run #2 Same as above with 5/5 dyeing to Radiance
Run #3 Mnk used Tornado > Shijin > Shijin > Victory with 5/5 dyeing to Victory and not Radiance
[+]

I am relatively new at making parties, It never occurred to me Deletus would one shot people. So now I got my pug route, and organized route
Pug Sortie Route
Nukers on A3,A4,Ac1,Ac2
Everyone who can't contribute hunts Obdella
Boss A
B3,B4,Bc1
Boss B (SP abilities)
Porxie
C3,C4
Boss C
Bhoot
Deletus
Rematerialize Bhoot if needed
Farm
Organized Sortie Route
Any competent player goes solo A3,A4,Ac1,Ac2, Obdella
Everyone Else To Deletus; then D3,D4 after
Reconverge on D boss, Blow SP abilities and burn him
Burn A boss
Split party
B party B3,B4,Bc1 then hunts Porxie
C party kills Bhoot, then C3,C4 ;Pref COR for bolters
B Boss (Sp abilities)
C Boss
Rematerialize Bhoot if needed
Farm
I will say my expectations may have been a wee high.


Totaly wrong , and if some Solo people still talking about A-3/4 it is because it is not consistent....
It is a forum , not a book with a start and an end ....
So yay go kill yourself and leave us in peace !!!
and yes the door is open also ....
It is a forum , not a book with a start and an end ....
So yay go kill yourself and leave us in peace !!!
and yes the door is open also ....
Fenrir.Aladeus said: »
Phoenix.Godofwars said: »
i was reading all these treads and my god you all still talking about A3/A4 wtf you can see the way it needs to be white dmg and magic kill not hard to do thats all you all talk about from page 1-46 move on lets talk more about B C D my god ppl who want to solo ***and cant cover your stuff then dont go in same as vagery omen and thing in this game i wanna go kill my self how much i see ppl talking about a3/a4
hey buddy, if you don't have anything constructive to say, there's the door. you don't have to be so rude.
rude lmaooo look here noobie they is no door here so your so 2008!
you must be one of them guys who go in solo with no ls or pugs and cant do a3/a4 cause i said im sick of trying to read up stuff for B C D but everyone still on a3/a4 why no one talks about b2/b3 or the rest of the boss thats's right cause not everyone can go in with ls or friends crap even pug group so you look here NOOB you better use trust lol jkjk
Nehot said: »
So I'd like to post my groups finding and have been able to confirm with with 3 runs thus far working every time.
Chest #B3 and Casket #B1
We had a solo DD run straight to the Umbril's in the B sector right from the start of the run and kill them using 4 WS's and at least one light SC. We got both chests at the same time after the fifth kill.
Runs went as followed:
Run #1 Sam used Fudo > Kasha > Shoha > Fudo and killed 4/5 with Radiance and last one with melee hit
Run #2 Same as above with 5/5 dyeing to Radiance
Run #3 Mnk used Tornado > Shijin > Shijin > Victory with 5/5 dyeing to Victory and not Radiance
Chest #B3 and Casket #B1
We had a solo DD run straight to the Umbril's in the B sector right from the start of the run and kill them using 4 WS's and at least one light SC. We got both chests at the same time after the fifth kill.
Runs went as followed:
Run #1 Sam used Fudo > Kasha > Shoha > Fudo and killed 4/5 with Radiance and last one with melee hit
Run #2 Same as above with 5/5 dyeing to Radiance
Run #3 Mnk used Tornado > Shijin > Shijin > Victory with 5/5 dyeing to Victory and not Radiance
now this what i'm talking about good work man will test this and use sam ty
zigzagzig said: »
Totaly wrong , and if some Solo people still talking about A-3/4 it is because it is not consistent....
It is a forum , not a book with a start and an end ....
So yay go kill yourself and leave us in peace !!!
and yes the door is open also ....
It is a forum , not a book with a start and an end ....
So yay go kill yourself and leave us in peace !!!
and yes the door is open also ....
o cry baby mad he cant do anything in game cause he solo with trust and have no friends and been playing since 2004 lol sorry you MAD?
Phoenix.Godofwars said: »
Nehot said: »
So I'd like to post my groups finding and have been able to confirm with with 3 runs thus far working every time.
Chest #B3 and Casket #B1
We had a solo DD run straight to the Umbril's in the B sector right from the start of the run and kill them using 4 WS's and at least one light SC. We got both chests at the same time after the fifth kill.
Runs went as followed:
Run #1 Sam used Fudo > Kasha > Shoha > Fudo and killed 4/5 with Radiance and last one with melee hit
Run #2 Same as above with 5/5 dyeing to Radiance
Run #3 Mnk used Tornado > Shijin > Shijin > Victory with 5/5 dyeing to Victory and not Radiance
Chest #B3 and Casket #B1
We had a solo DD run straight to the Umbril's in the B sector right from the start of the run and kill them using 4 WS's and at least one light SC. We got both chests at the same time after the fifth kill.
Runs went as followed:
Run #1 Sam used Fudo > Kasha > Shoha > Fudo and killed 4/5 with Radiance and last one with melee hit
Run #2 Same as above with 5/5 dyeing to Radiance
Run #3 Mnk used Tornado > Shijin > Shijin > Victory with 5/5 dyeing to Victory and not Radiance
now this what i'm talking about good work man will test this and use sam ty
I just attempted this on my Sam alt and it took 5 Radiance kills to get the blue chest and one more Radiance kill to get the brown chest (total 6 kills for both chests)


Killed Umbrils with only Seraph Blade on RDM only got B3 B4
Phoenix.Godofwars said: »
I can feel the road rage oozing out of you.
[+]

Demisang Deliterious sword variant. CDC hit me for 2532 with cocoon, phalanx and -DT hybrid gear on, was just auto attacking. Occultation was up too. Stars just aligned in its favor I guess. Careful with anything that can crit WS.
Fenrir.Jinxs said: »
Killed Umbrils with only Seraph Blade on RDM only got B3 B4
This makes me think that the B3/4 is for WS damage of the opposite element to which includes SC damage.
My next theory is the blue chest is using 3 different WS's on 5 enemies. I plan to do more testing tomorrow evening.
Test will be: Sam - Fudo > Kasha > Shoha > Fudo with no SC's, waiting till the window closes to use next WS on 5 umbril's
Will post results after testing.

Alrighty lads and lasses it's been a few days since our last info dump and it is coming to a close on the known objective front. In addition, we'll be posting our opinion on an optimized run tomorrow after we polish off the last few relatively worked-out objectives.
Tomorrow's update will likely be the last until the final two objectives are found. We are still actively searching for them but I will only be updating and reposting again when significant meaningful change is made to any objectives. Anything else I will just update objectives in this post and/or Chim will help update BG.
Spoilered-out triggers that are 100% replicated to save space and your eyes. I will now make objectives we know work but are for sure not exact in blue. Do blue ones in the listed way exactly to hit the proc. We don't know why, so there will be other ways to hit it. Feel free to read... all 47 pages of the thread and contribute if you wish!
This event is meant to be fun so figuring out the exact triggers is just as valid a use of your entry as route planning and smashing all bosses or just single box farming what you can. Go wild! Maybe you'll hit one of the missing objectives by accident!
Zone A -
Zone B -
5/7 - Blue Casket #1 - Skillchains then kill? Might have to be done before Porxie kill. Fuzzy on exact conditions. We are getting it with great consistency now by doing multi-step light SCs on Umbrils. Lotta discussion in the thread on this one will be needed to narrow down the exact cause.
Zone C -
5/7 - Blue Casket #1 - Kill with extreme haste. This is looking like 30 seconds or less kills as the requirement.
6/7 - Blue Casket #2 - We are presuming the pattern holds and this is a non-combat objective.
7/7 - Red Coffer - Kill Bhoot. We've hit this three times in a row. All 3 times are within 2.5 mins of entering C, no extra kills, and under 60 sec of engaging. Feel free to help narrow it down from there.
Zone D -
6/7 - Blue Casket #2 - We are presuming the pattern holds and this is a non-combat objective. Reportedly kill AF > Relic > Empy in that order of the same job in a row. We have tried this multiple times. It either needs extra steps, we are doing something wrong, or this is not actually the objective.
Zone D Boss - Degei
Misc Fun Facts -
[The below is now proven false. We either have bad logs from night #1 or something else was happening in the first few hours.]
Being out of exp range will not give you the spoils of a chest.
It appears that you need to be in range both when the chest spawns and when it is opened to get credit for the drops.
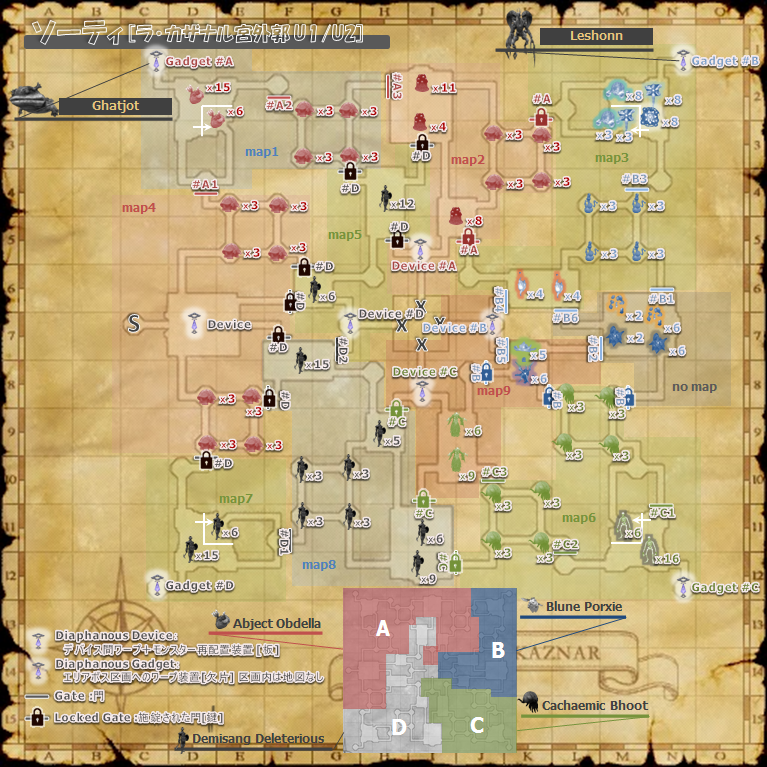
Map -
Tomorrow's update will likely be the last until the final two objectives are found. We are still actively searching for them but I will only be updating and reposting again when significant meaningful change is made to any objectives. Anything else I will just update objectives in this post and/or Chim will help update BG.
Spoilered-out triggers that are 100% replicated to save space and your eyes. I will now make objectives we know work but are for sure not exact in blue. Do blue ones in the listed way exactly to hit the proc. We don't know why, so there will be other ways to hit it. Feel free to read... all 47 pages of the thread and contribute if you wish!
This event is meant to be fun so figuring out the exact triggers is just as valid a use of your entry as route planning and smashing all bosses or just single box farming what you can. Go wild! Maybe you'll hit one of the missing objectives by accident!
Zone A -
Zone B -
5/7 - Blue Casket #1 - Skillchains then kill? Might have to be done before Porxie kill. Fuzzy on exact conditions. We are getting it with great consistency now by doing multi-step light SCs on Umbrils. Lotta discussion in the thread on this one will be needed to narrow down the exact cause.
Zone C -
5/7 - Blue Casket #1 - Kill with extreme haste. This is looking like 30 seconds or less kills as the requirement.
6/7 - Blue Casket #2 - We are presuming the pattern holds and this is a non-combat objective.
7/7 - Red Coffer - Kill Bhoot. We've hit this three times in a row. All 3 times are within 2.5 mins of entering C, no extra kills, and under 60 sec of engaging. Feel free to help narrow it down from there.
Zone D -
6/7 - Blue Casket #2 - We are presuming the pattern holds and this is a non-combat objective. Reportedly kill AF > Relic > Empy in that order of the same job in a row. We have tried this multiple times. It either needs extra steps, we are doing something wrong, or this is not actually the objective.
Zone D Boss - Degei
Absorbs damage based on the most recent TP move. Blue proc by nuking the opposite element. See Perfidien for weaponskill elemental associations.
Misc Fun Facts -
We can confirm repeat sapphires from the same on different runs.
We can also now confirm it is possible to get both Red Coffer and Aurum Coffer from the last NM at the same time.
We can confirm sapphires from blue chests.
Boss rooms (gadgets) have doors that will slam shut once you engage the boss. Make sure everyone is inside or you're likely screwed.
[The below is now proven false. We either have bad logs from night #1 or something else was happening in the first few hours.]
It appears that you need to be in range both when the chest spawns and when it is opened to get credit for the drops.
Map -
[+]

An interesting discovery, because a SCH and I were able to hit A3 and 4 reliably even though I was BPing on them: Blood Pacts do NOT count as weapon skills.
[+]

Having a hard time tryin to keep up with this fantastic discussion.
Did you guys find out:
1) the reasons why FFXIDB isn't working sometimes
2) if Summoner Avatar Magical BP kills count as "magic kills" for the related objectives, or not?
Did you guys find out:
1) the reasons why FFXIDB isn't working sometimes
2) if Summoner Avatar Magical BP kills count as "magic kills" for the related objectives, or not?
2. No, it doesn't count as magic or WS.
Ragnarok.Kanryu said: »
Zone D -
Spoiler Alert! Click to view.
1/7 - Key #D - Open gates D-2 and D-1 within 2 minutes of each other.
2/7 - Plate #D - Drop the Obsidian Fireflys while on the platform next to Device D.
3/7 - Shard #D - Perform a 4-step SC on 3 fomors. [Credit to Ahlen for this.]
4/7 - Metal #D - Do the above again.
5/7 - Blue Casket #1 - Killed an entire party of Fomor at F-6 or H-9. (Maybe other places too, but this works 100%)
re: #5
It's not a full pt of fomors. Just kill one of each job -- WAR, WHM, MNK, BLM, RDM, THF.
We discovered this a few days ago when we pulled the NM in the WAR WHM THF room near device, aggroing all 3 types and having to kill them. Went SE to the room with the full pt of 6 and began killing. Got blue once the MNK RDM and BLM were dead but others were alive. Have replicated this three days in a row, purposefully killing something we'd killed prior last to verify.
To take it a step further, took an alt solo on COR today. Popped into D to see if Obdella was hiding in there again (it was!) but before I could even get to where it was, the Fomor NM was alone in a tunnel. Had to jump on that chance. Killed it. Saw 4 fomors in the next room and thought I could single pull a WAR. I could not... lol. So I got 2 WARs, a BLM and a MNK on me. Managed to kill all 4. In that time a WHM had wandered from the pack, so I grabbed it. While I did that, a RDM wandered off and I killed it. Just the THF left but both of them were embedded in large groups. I left it alone.
Went back to A.. got my 5th kill there, did the door, went to B, got that blue, the porxie, the door, went into C, killed the bhoot... came back into D like 25 minutes later, hunted down a THF on its own. Killed it for the blue box. I cant give you a better example than that =o
[+]


Sehrahin said: »
Lethargy set bonus works even when you mix the set. The person who reported the finding only checked the plugin timers most likely, as it doesn't work with them (I knew this because I tested SCH gloves the other day, and figured I'd test RDM too).
My test, duration with lethargy feet +1 to the left and +2 to the right:
regen
6:42 to 6:54
haste
12:07 to 12:26
refresh
7:57 to 8:11
My test, duration with lethargy feet +1 to the left and +2 to the right:
regen
6:42 to 6:54
haste
12:07 to 12:26
refresh
7:57 to 8:11
Since someone hates math and didn't believe my findings and took back the false information about Lethargy set not working (on bgwiki), here are some more test. My previous test was with just replacing my +1 feet with +2 in my full duration set, so here's the same isolated into a few pieces:
Refresh III with legs+1/feet+2
12:04:17–12:08:43 - 4 minutes and 26 seconds
Refresh III with feet +2
12:08:54–12:12:56 - 4 minutes and 2 seconds
Refresh III with relic body+3/ambu cape (for +35 duration non augmented, same as emp feet +2) and lethargy hands/legs+1
12:14:58–12:19:24 - 4 minutes and 26 seconds
So please stop spreading false information about the set bonus not working.
")
Nehot said: »
Phoenix.Godofwars said: »
Nehot said: »
So I'd like to post my groups finding and have been able to confirm with with 3 runs thus far working every time.
Chest #B3 and Casket #B1
We had a solo DD run straight to the Umbril's in the B sector right from the start of the run and kill them using 4 WS's and at least one light SC. We got both chests at the same time after the fifth kill.
Runs went as followed:
Run #1 Sam used Fudo > Kasha > Shoha > Fudo and killed 4/5 with Radiance and last one with melee hit
Run #2 Same as above with 5/5 dyeing to Radiance
Run #3 Mnk used Tornado > Shijin > Shijin > Victory with 5/5 dyeing to Victory and not Radiance
Chest #B3 and Casket #B1
We had a solo DD run straight to the Umbril's in the B sector right from the start of the run and kill them using 4 WS's and at least one light SC. We got both chests at the same time after the fifth kill.
Runs went as followed:
Run #1 Sam used Fudo > Kasha > Shoha > Fudo and killed 4/5 with Radiance and last one with melee hit
Run #2 Same as above with 5/5 dyeing to Radiance
Run #3 Mnk used Tornado > Shijin > Shijin > Victory with 5/5 dyeing to Victory and not Radiance
now this what i'm talking about good work man will test this and use sam ty
I just attempted this on my Sam alt and it took 5 Radiance kills to get the blue chest and one more Radiance kill to get the brown chest (total 6 kills for both chests)
Thanks for this. Just tried and managed to replicate it on the umbrils.

Thats some useful info on Leaden Spam. We've found doing Aeolian Edge to be a bit unreliable, perhaps due to mobs not being claimed when they die.
Last 2 days We've have killed Porxie and got no chest.
Both times we with have opened Chests B2, B3, B4 and Casket B1. Today we had also opened B1. Can't actually remember if we had done Casket B2.
Last 2 days We've have killed Porxie and got no chest.
Both times we with have opened Chests B2, B3, B4 and Casket B1. Today we had also opened B1. Can't actually remember if we had done Casket B2.

Ragnarok.Kanryu said: »
5/7 - Blue Casket #1 - Skillchains then kill? Might have to be done before Porxie kill. Fuzzy on exact conditions. We are getting it with great consistency now by doing multi-step light SCs on Umbrils. Lotta discussion in the thread on this one will be needed to narrow down the exact cause.
I've gotten it many times as COR warping to B and spamming Leaden on fire elemental. So no Skillchains at all and I still get it. Though it's not very consistant as I mentioned in a previous post. Last night I got it after 4 kills but in other runs I have gotten it in 3 or 5 kills and even had a couple runs where I didn't make it drop.
So I don't know what exactly it is but I can say 100% sure it isn't related specifically to Skillchains as I get it to drop without doing a single one.
Asura.Jokes said: »
Thats some useful info on Leaden Spam. We've found doing Aeolian Edge to be a bit unreliable, perhaps due to mobs not being claimed when they die.
Last 2 days We've have killed Porxie and got no chest.
Both times we with have opened Chests B2, B3, B4 and Casket B1. Today we had also opened B1. Can't actually remember if we had done Casket B2.
Last 2 days We've have killed Porxie and got no chest.
Both times we with have opened Chests B2, B3, B4 and Casket B1. Today we had also opened B1. Can't actually remember if we had done Casket B2.
The difference between my group on weather or not the red coffer drop has always been Casket B1. If it was one of the few runs where we didn't see it. We knew we weren't getting the red coffer and it was true. Everytime we opened casket B1 we got the red coffer.
KujahFoxfire said: »
As I posted previously in this thread, B Blue/Shard/Metal are 100% NOT skillchain related specifically. The below was 10 kills total in the zone and nothing killed before hand (/hurray and locked #B were done). Blue after 3 chests, Shard after 5 total, metal after 10 total. A mix of weak to and not weak to elements from Leaden, Only Malaise on the elementals and no other sources of damage outsid of the cor autos.
It has just dawned on me that Umbrils themselves do count as elementals. Could we be looking at something day based for these. Something in line with abyssea of killing elementals based on current/previous/next day?
Code
22:14:18[Palmroth] 68636 Leaden Salute → Biune・Ice・Elemental
22:14:29[Palmroth] 99999 Leaden Salute → Biune・Ice・Elemental
22:14:29Palmroth defeats the Biune Ice Elemental.
22:14:47[Palmroth] 42204 Leaden Salute → Biune・Water・Elemental
22:14:59[Palmroth] 99999 Leaden Salute → Biune・Water・Elemental
22:15:23[Palmroth] 99999 Leaden Salute → Biune・Water・Elemental
22:15:23Palmroth defeats the Biune Water Elemental.
22:15:45[Palmroth] 99999 Leaden Salute → Biune・Water・Elemental
22:15:54[Palmroth] 85796 Leaden Salute → Biune・Water・Elemental
22:15:54Palmroth defeats the Biune Water Elemental.
22:15:54#B treasure coffer status report: 3/7 #?: 0/1. (THIS WAS BLUE)
22:16:27[Palmroth] 86706 Leaden Salute → Biune・Water・Elemental
22:16:36[Palmroth] 86750 Leaden Salute → Biune・Water・Elemental
22:16:36Palmroth defeats the Biune Water Elemental.
22:17:21[Palmroth] 55569 Leaden Salute → Biune・Ice・Elemental
22:17:36[Palmroth] 75788 Leaden Salute → Biune・Ice・Elemental
22:17:44[Palmroth] 51444 Leaden Salute → Biune・Ice・Elemental
22:17:44Palmroth defeats the Biune Ice Elemental.
22:17:44#B treasure coffer status report: 4/7 #?: 0/1.  (THIS WAS SHARD)
22:18:28[Palmroth] 61061 Leaden Salute → Biune・Light・Elemental
22:18:42[Palmroth] 68421 Leaden Salute → Biune・Light・Elemental
22:18:48[Palmroth] 39439 Leaden Salute → Biune・Light・Elemental
22:18:48Palmroth defeats the Biune Light Elemental.
22:19:31[Palmroth] 73182 Leaden Salute → Biune・Light・Elemental
22:19:45[Palmroth] 84462 Leaden Salute → Biune・Light・Elemental
22:19:45Palmroth defeats the Biune Light Elemental.
22:20:16[Palmroth] 82940 Leaden Salute → Biune・Light・Elemental
22:20:27[Palmroth] 79680 Leaden Salute → Biune・Light・Elemental
22:20:27Palmroth defeats the Biune Light Elemental.
22:20:58[Palmroth] 29182 Leaden Salute → Biune・Light・Elemental
22:21:08[Palmroth] 41906 Leaden Salute → Biune・Light・Elemental
22:21:23[Palmroth] 87691 Leaden Salute → Biune・Light・Elemental
22:21:23Palmroth defeats the Biune Light Elemental.
22:21:54[Palmroth] 31096 Leaden Salute → Biune・Light・Elemental
22:22:07[Palmroth] 49840 Leaden Salute → Biune・Light・Elemental
22:22:22[Palmroth] 48587 Leaden Salute → Biune・Light・Elemental
22:22:30[Palmroth] 29018 Leaden Salute → Biune・Light・Elemental
22:22:30Palmroth defeats the Biune Light Elemental.
22:22:30#B treasure coffer status report: 5/7 #?: 0/1. (THIS WAS METAL).
It has just dawned on me that Umbrils themselves do count as elementals. Could we be looking at something day based for these. Something in line with abyssea of killing elementals based on current/previous/next day?
I also don't believe that the B3/4 is 100% Skillchain related (due to the fact that I have managed to kill with AA and WS and not SC and still got the chests only after Light SC happened) and no its not day related as well because I made sure to do these on different days and multiple people have reported getting B3/4 from Leaden/AE/Trueflight/Seraph/etc. I believe it has to do with dealing elemental damaged of the opposite element that is or comes from WS's. I cannot recall anyone getting B3/4 from casting spells alone.
Asura.Aerox said: »
Nehot said: »
Phoenix.Godofwars said: »
Nehot said: »
So I'd like to post my groups finding and have been able to confirm with with 3 runs thus far working every time.
Chest #B3 and Casket #B1
We had a solo DD run straight to the Umbril's in the B sector right from the start of the run and kill them using 4 WS's and at least one light SC. We got both chests at the same time after the fifth kill.
Runs went as followed:
Run #1 Sam used Fudo > Kasha > Shoha > Fudo and killed 4/5 with Radiance and last one with melee hit
Run #2 Same as above with 5/5 dyeing to Radiance
Run #3 Mnk used Tornado > Shijin > Shijin > Victory with 5/5 dyeing to Victory and not Radiance
Chest #B3 and Casket #B1
We had a solo DD run straight to the Umbril's in the B sector right from the start of the run and kill them using 4 WS's and at least one light SC. We got both chests at the same time after the fifth kill.
Runs went as followed:
Run #1 Sam used Fudo > Kasha > Shoha > Fudo and killed 4/5 with Radiance and last one with melee hit
Run #2 Same as above with 5/5 dyeing to Radiance
Run #3 Mnk used Tornado > Shijin > Shijin > Victory with 5/5 dyeing to Victory and not Radiance
now this what i'm talking about good work man will test this and use sam ty
I just attempted this on my Sam alt and it took 5 Radiance kills to get the blue chest and one more Radiance kill to get the brown chest (total 6 kills for both chests)
Thanks for this. Just tried and managed to replicate it on the umbrils.
Awesome! I hope more people get the same results reliably and get help to figure out why this is happening, I have my theories just need to do do more testing
All FFXI content and images © 2002-2026 SQUARE ENIX CO., LTD. FINAL
FANTASY is a registered trademark of Square Enix Co., Ltd.