Dynamis-D Strategy For New Groups

言語: JP EN DE FR
2010-06-21
New Items
users online
フォーラム » FFXI » Endgame » Dynamis » Dynamis-D Strategy for New Groups
Dynamis-D Strategy for New Groups
First Page 2 3
 Cerberus.Kylos
Offline
サーバ: Cerberus
Game: FFXI
user: Kylos
Posts: 4295
By Cerberus.Kylos 2021-12-02 22:19:36  
Hi folks,

One of the last things my group and I are looking to overcome is Dynamis-D, primarily to get our masks complete. We have already entered wave 3 in several zones (not tried Windurst yet), and had a pop at the Galka in Bastok, but we're still some way off. The first main boss we defeated was Halphas (on our first attempt), although it was extremely dangerous and took a long time. Tonight, we absolutely destroyed Obstatrix, but wave 3 proved difficult.

There's a lot of strategies out there all over the place, and I think it would be cool to bring more recent strategies in to one place. I'd like to pull together many of the basics with help from those who have destroyed this content over and over.

The below information has been pulled together from personal experience and others feedback.

Statue Colours

San d'Oria - Blue eyes = Magic Weak / Green eyes = Physical Weak
Bastok - Blue eyes = Dark Weak / Green eyes = Light Weak
Windurst - Blue eyes = Reduced Physical Damage (-50%) / Green eyes = Reduced Ranged/Magic Damage (-33.3%)
Jeuno - Blue eyes = +50% DT, AoE's won't work / Green eyes = +20% DT and enfeebling (% Sleep) resistant

The above stats only affect the beastmen they spawn, and not the statues themselves.

- Most groups bring Corsairs with Leaden Salute (Ranger with Trueflight also works) to deal with statues. Any kind of elemental magic works though, so BLM, RDM, GEO, SCH, and even SMN can play their part. If statues are defeated in one blow, they will not spawn beastmen. This is crucial if you are looking to save time for wave 3.

A group brings COR+RNG because mage nukers cannot kill statues in one blow. The colour you aim for depends on the beastmen you want to deal with if there is a resist. Bear in mind that Lightsday makes resists more likely for Leaden Salute, and Darksday more likely for Ranger's Trueflight.

For example, in San d'Oria, do you have a melee setup? Then green would be safer, because if your statue killers resist you can kill beastmen quicker. However, if you are setting up magic bursts for wave 2? Or are using COR+RNG magic WS? You may prefer blue.

In Bastok, again, are you using Leaden Salute? Blue eyes would be preferred, so the Corsairs can be more effective against beastmen. Windurst is very much like San d'Oria. Jeuno is unique, because green eyes means you can't sleep your enemies! This may be acceptable in wave 1 if your group is strong enough, but in wave 2? I wouldn't advise it. Jeuno is mostly a blue eye zone.

Other Statues

Red Eyes are special statues which spawn Notorious Monsters. They can be avoided unless you are only interested in farming the shards they drop. The NMs are far more difficult than regular beastmen, and therefore eat up more time.

San d'Oria - Orcs will gain access to Counterstance. This sucks! If you are a melee, you must stand behind them at all times.

Bastok - Quadav gain access to Wrath of Gu'Dha. It is an AoE move which enfeebles players with Gravity and knocks them back. The group is best off fighting on a wall to prevent time loss. Shadows will stop Gravity being applied.

Windurst - Yagudo use Doom on the target with hate. Your tank and melee damage dealers should bring plenty of Holy Waters. Healers need some kind of Cursna set. Please, do not overlook this. Holy Waters rarely do the job, but a prepared healer will.

Jeuno - Goblins have Goblin Dice for random buffs to themselves, and rarely your group. There is no way you can prepare for this, so don't worry about it.

Colourless - All zones have one of these statues up at any time. It spawns Aurix with beastmen (with none of the above stats applied) and should be fought first. Aurix can spawn on any wave, including from elemental fetters in wave 3. Prefers to use Bomb Toss, but also has other Goblin TP moves: Frypan, Goblin Rush, Smokebomb, Paralysis Shower and Crispy Candle.

Beastmen

There's not much difference between regular monsters across all four zones. Statues are best taken down with magical damage and not melee'd on. You should be aware that Beastmen have dual jobs, and should be targeted based on which is more dangerous. Something like this:

BLM > SMN (sleep avatar) > RDM/BRD > PLD/THF (make them SP early) > everything else > MNK > BST > NIN

Job - San d'Oria (S) / Bastok (B) / Windurst (W) / Jeuno (J)

BLM/GEO - Evoker (S) / Magister (B) / Magian (W) / Arcanomancer (J)
SMN/WHM - Medic (S) / Mender (B) / Orisha (W) / Vivifier (J)
RDM/RUN - Enchanter (S) / Magician (B) / Prognosticator (W) / Defiler (J)
BRD/SAM - Troubador (S) / Balladeer (B) / Minnesinger (W) / Flautist (J)
PLD/DRG - Knight (S) / Cavalier (B) / Champion (W) / Banneret (J)
THF/DNC - Fleetfoot (S) / Trickster (B) / Ruffian (W) / Vandal (J)
MNK/PUP - Pugilist (S) / Combatent (B) / Ascetic (W) / Fistfighter (J)
BST/RNG - Tamer (S) / Harnesser (B) / Empath (W) / Animist (J)
NIN/BLU - Shinobi (S) / Shadowstalker (B) / Spy (W) / Operative (J)

Wave 2 Beastmen are considerably stronger. If the group is low man or not well equipped, consider a skillchain which can magic burst their weakest element. Beastmen weaknesses are as follows:

Orc = Water (Darkness)
Quadav = Thunder (Light)
Yagudo = Ice (Darkness)
Goblin = None

- It's important to remember that Quadav's have shells, which means reduced damage when attacking from behind.

Yagudo use stun TP moves Sweep (AoE) & Double Kick. Orcs have Shoulder Attack & Aerial Wheel. Quadav use Shell Bash & Headbutt. Barthunder may be preferred to counter Stun, especially against Yagudo's Sweep. Goblin's main weapon is Bomb Toss, so Barfire makes sense.

Buffs for Rune Fencers? You can refer to my guide for rune choices here:

Which Runes To Use? Gathering Info.

I have the following listed. Please correct me if you believe otherwise:

Orcs = Unda x3 (weak to water) / Tenebrae x3 (counter Charm)
Quadav = Sulpor x3 (weak to thunder)
Yagudo = Gelus x3 (weak to ice)
Goblin = Unda x3

If you prefer to counter stuns from Orc, Quadav, and especially Yagudo, Telus x3 is preferred. Anything that can Charm is best with Tenebrae x3 & Pflug.

Mid-Boss

The mid-boss in each zone are very similar. They have natural regain, so will use TP moves regardless of actions. The regain gets stronger the lower HP gets, which means more TP moves like Seismostomp. If a melee is in range to open a skillchain, it is recommended they have shadows to absorb stomps.

Magic damage is the way to go, especially Magic Bursts. Have a GEO? Ask them for Indi-Acumen & GEO-Malaise. Enfeeble the boss with Frazzle. Get a Wizard's roll from the Corsair. Rune Fencers shouldn't forget that they have access to Gambit & Rayke, which boosts magic damage even more!

For my group, I open with Ground Strike on Rune Fencer. Then, a COR will make Darkness by following with Leaden Salute. At this moment, any jobs which can MB (including SCH/RDM/GEO/SMN) can do great damage with Ice or Stone. To extend the skillchain with double darkness, a second COR can make a 3-step with Wildfire.

Ground Strike > Leaden Salute = Darkness (Ice/Stone) > Wildfire = Double Darkness (Ice/Stone)

Alternatively, if your tank focuses on hate, a THF/NIN can open for a COR with Rudra's Storm for Darkness. Some say a 2-handed DD should open, but it depends if they have shadows. Without that, they will be stunned much of the time. Before heading out, use FFXIcalc to see which jobs can open.

We have also done this the Scholar way. Using the weaknesses above, you're best off using level 2 Immanence skillchains:

Overlord Tombstone (S) = Distortion (Ice/Water*)
Mu'Sha Effigy (B) = Fragmentation (Wind/Lightning*)
Envincing Idol (W) = Distortion (Ice*/Water)
Impish Golen (J) = Fusion (Fire/Light*)

On the Tombstone, for example, you will have the choice to MB either Ice or Water, and orcs are weak to Water. The most difficult of these is Impish Golem, because they aren't many Light based nukes for Fusion. FFXIclopedia is the best source for Magic Burst options on skillchains.

**Quickest Route**

Looking to do wave 3? You'll want to cut down on the seconds it takes to get to the bosses. Here are some maps, courtesy of the BGwiki "Better Dynamis-ing" guide.


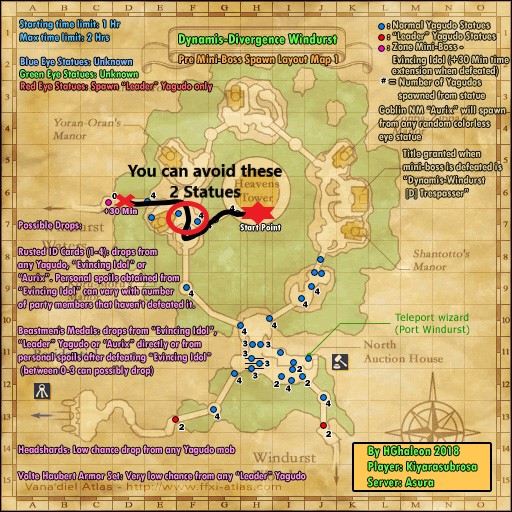
You may notice there is no Jeuno map, but it's pretty simple. After entering, run up the stairs and buff up. Ignore what is normally a red eye statue at the Auction House. Kill the one blocking the way to the palace. From here, hug the left wall and ignore the statues on the right.

There is a statue at the entrance to the palace to kill. Behind this, you will see two statues either side of the mid-boss stairs. If done right, you can walk between and completely ignore these statues. Here's the line you need to avoid them... forgive my poor Paint skills.


As you may have guessed, the red line is the route to get past the statues (blue boxes) without aggro. You can run, but walk if you're feeling unsure. After the mid-boss, the group can take the same route to get past the statues on the way to Obstatrix.

Zone Boss (Universal)

Zone Boss refers to the Beastmen leaders at the end of wave 2. This section outlines universal buffs and debuffs in a party using a melee setup.

GEO - Indi-Barrier is commonly used. Entrust would change depending on target & party. Because debuffs are nerfed by 75% in Dynamis-D, you are encouraged to use buffs like Attunement for tanks, and Fury for DD. Make sure you know which is required of you. You would set up fresh bubbles with Bolster just before 50%, to give the group the best buffs at the toughest moment.

RUN - Unless you have two heavy DD like WAR & SAM, I have found it useful to store up Great Axe to 3k TP for Weapon Break. This gives the enemy -25% attack down for 5 minutes. However, if your party is likely to take longer than this, you may want the alternative stated below.

Keep up Phalanx & Cocoon the best you can. Use 1 hours if hate becomes an issue. Consider switching to Tenebrae + Vivacious Pulse if you run out of MP. Also, for wave 3 especially, make sure all your midcast sets have damage taken, and you line up pulls in front of you for parrying.

PLD - Save Invincible unless hate becomes an issue. Use Intervene in the last 50% if the enemy gets dangerous. Keep up Phalanx & Cocoon the best you can. Your Protect is the strongest with Majesty, so let the WHM know to ignore Protectra. On wave 3, ensure your midcast sets have damage taken, and you link up pulls in front of you for blocking.

WAR/SAM/Club - Much like above. Armor Break (GA), Tachi: Ageha (GK), and Staff's Shell Crusher, each enfeeble the enemy with -25% defense down. However, they do not stack, so choose whoever is most likely to land it. DRG's abilities only give 20%, while Blue Mage's Tourbillion (33.3%) lasts 1-2 minutes.

Great Axe's Full Break is often considered. Despite only granting 12.5% attack/defense down, at 3k it lasts for 12 minutes. This is over two times longer than Weapon Break's Attack Down, and three minutes more than Armor Break. It negates Ka'Rho Fearsinger's Shell Guard, so would keep it powerless for longer.

RDM - The most useful job in Dynamis-D gets heavy use. Don't forget to Cure if needed. Never stop casting.

Buffs: Haste 2. Refresh III.

Enfeebles: Dia III. Frazzle. Distract. Slow. Paralyze. Silence. Addle. Inundation. Dispel. Blind. Sleep. Break. Impact.

COR - Crooked Chaos + Samurai Roll. Light Shot the RDM's Dia III. Wild Card the party under 25%? Depends on how it's going.

WHM - Auspice. Regen IV. Boost-VIT in tank party, Boost-STR in DD party. Favour Curaga over single target heals. Keep up defensive spells like Phalanx & Aquaveil, more so for hate resets like Halphas. Sacrosanctity, Asylum and Devotion could provide some short-term relief, but don't get killed doing them.

Melee DD - Use the right food. If you know you have enough accuracy, Red Curry Bun provides a substantial attack boost. Most DD default to Sublime Sushi for accuracy. Zerg with your 1-hours from 50%. Pulling hate on Zone Boss? Back off until the tank gets hate back. Being dead is less damage overall.

Speaking of accuracy, here are some checks (with buffs) to consider:

Wave 1: 1250-1300
Wave 2: 1375-1400
Wave 3: 1600+

Also, it's important to remember that repeatedly using the same weaponskill will incur a damage penalty. For example, if you bring DDs who only Savage Blade, this would make bosses harder to kill, because the damage would be considerably less than if you mix it up. Lastly, make sure you have damage taken sets, including a hybrid TP/DT set (with enough accuracy) for wave 3.

Halphas (S)

Positioning for Halphas is crucial compared to other zone bosses. Experienced groups may be able to get away with fighting it at the Mog House, but others may feel safer using a height difference to make it safer for healers.

-Information needed-
[+]
 Ragnarok.Lowen
Offline
サーバ: Ragnarok
Game: FFXI
user: Rorrick
Posts: 316
By Ragnarok.Lowen 2021-12-02 22:33:04  
It would probably be easier to know which zone/what parts you're struggling with rather than just rattle off strats that may not be applicable to you. Generally speaking abusing Geo-Malaise and magic weaponskills will carry you pretty far.
 Asura.Ramsy
Offline
サーバ: Asura
Game: FFXI
user: Ramsy
Posts: 281
By Asura.Ramsy 2021-12-02 22:56:54  
Should go more into detail a bit or even more over what exactly made it difficult for you guys. Wave 3 gave my group a hard way to go at first, but once we adjusted buffs and found a solid rdm we were able to breeze right though even with pugs
 Cerberus.Kylos
Offline
サーバ: Cerberus
Game: FFXI
user: Kylos
Posts: 4295
By Cerberus.Kylos 2021-12-02 23:17:50  
It's a bit of everything really. I wouldn't want this to be just about wave 3, but building up a groups strategy to get to that level. You should know how to deal with wave 1 and 2 before thinking about 3, just in case unexpected things happen along the way.

In the OP, I've added what statue eyes do, and some details on regular beastmen. Yes, this is very basic, but it's important because people forget things. I'll add more over time, but feel free to give feedback on anything which doesn't look right. By doing it this way, I ensure we know the basics before getting in to the deep end.

Edit: Added a lot more detail, including the mid-bosses. Wave 2 bosses is where it gets more complicated. I think Halphas would be a good one to start with, because some say it is the toughest boss in Dynamis-D.

Another thing I'd hope to see is the use of Barspells. Does anyone have a list of which spells to use in each zone, boss etc?
 Odin.Senaki
Offline
サーバ: Odin
Game: FFXI
user: Senaki
Posts: 1146
By Odin.Senaki 2021-12-03 01:34:30  
As someone who's played for years, but kinda was always on Geo for Dyna, I appreciate this post. Suddenly a lot of stuff makes sense lol.
 Asura.Sechs
Offline
サーバ: Asura
Game: FFXI
user: Akumasama
Posts: 9876
By Asura.Sechs 2021-12-03 02:17:17  
Great list, I suggest you add Barthunder or similar to defend against a pretty common move from Yagudo in Windurst that can AoE stun.
Buffing up your thunder resistance reduces the number of seconds you stay stunned after that move, with some occasional full resist (not stunned at all) depending on the value you can reach and other aspects.
[+]
 Phoenix.Capuchin
Offline
サーバ: Phoenix
Game: FFXI
user: Anza
Posts: 3475
By Phoenix.Capuchin 2021-12-03 02:46:23  
1) COR is definitely great for statue killing, but I'll toss out there that a good RNG is also more than capable of one-shotting statues (we have a Gastra RNG who is a machine when it comes to going out and sniping statues). Would also add that if you're a little light on CORs or other magical WS users but you have some mage jobs with you, they can do a good job of quickly killing statues that the group has pulled.

2) I'd be interested to see WHERE most people fight the wave 2 bosses, as it can really make things easier to pull them to a location where you can take advantage of height differentials to keep the backline more safe. Keep in mind that the players near the NM need to be close enough to have cures hit them. I realized I haven't really checked out where others do these fights - perhaps most people are similar, but I'm not sure! For us:

San d'Oria: Between some of the merchant stalls to the E of the AH and zone to Ronfaure. Mages up top on the rampart (where the THF/DNC NM spawns in wave 2, need to go up the stairwell to get up top). Tank holds Halphas between a couple of the stalls, not so far as to not be able to be cured.

Bastok: On the ramp near where the wave 1 midboss spawns, mages up top and out of range (30') unless needed to move in and cure (AoE hurts).

Windurst: Near the end of the bridge leading away from the tower to the "circle" around the zone. Again, mages up top and tank/melees down below in the area to the west of the bridge.

Jeuno: Tank it down near zone into Mog House, mages up top (upstairs from the MH entrance).

3) A solid PUP tank can really help on wave 3 pulls if you're struggling. PUP with good pet tanking gear/attachments can hold the sets of 4 mobs on each side of the wave 3 circles, while the "fighting" party pulls them off one at a time. Deploy on the specially named Volte mob to pull the set of 4, fight named Volte mob last. PUP can also tank Bastok/Jeuno wave 2 bosses well, and the wave 3 bosses.

4) On the wave 3 mega bosses... (a) MAKE SURE EVERYONE BRINGS MULTIPLE RERAISE ITEMS for when summoned Odin wipes RR and 1-shots everyone who didn't have it up, (b) for the love of god, don't fight WHM or COR adds until they are very safely separated from the boss (you don't want Benediction or Wild Card refiling the boss HP to 100%).

5) Once you're really comfortable with the zones, IMO the most fun you get to have in Dyna is playing recklessly with BST mobs. Can you get charmed and murder three LS mates before anyone notices what happened? Can you destroy the charmed person before they kill your healer? Can you get bragging rights by using Holy II to take out that cocky DD? FIND OUT NEXT WEEK, ON DYNAMIS DIVERGENCE! [obviously not a great strategy for optimal efficiency... but plenty of fun!]
 Asura.Wotasu
Offline
サーバ: Asura
Game: FFXI
user: Wotasu
Posts: 339
By Asura.Wotasu 2021-12-03 02:58:32  
If you have 2 parties with competent DD's with right support(BRD/COR/Healer), you can split up and go 1 route each to speed up killing on w1 and 2.
It helps a lot on big zones like Windy, Bastok & Sandy. Make sure you always try to pull the right Eye color.

Also having ok Cors for statue duty is important. Rdm can also help on statues if they got su4-5

Use barthundra on all zones to avoid AoE stun from statues, Leg Sweep in Windy, Should Tackle in Sandy and Head Butt in Bastok

And on the puller part steady flow of mobs but not overwhelm Cors with statues.

I myself is our puller as Brd abusing Eva set+mambos. Pull > Horde(midcast eva set) go for the next statue which is the annoying part with packet loss sometimes have to wait for eye cycles to be 100% sure of color c.c;

The W2 Bosses are generally the hard part(aside from Jeuno), either slow and steady with hight difference, or brute force 1hour's SV/CC songs, DT sets under 50%, and Intervene from a pld will make it mostly harmless for 30seconds(have 2 plds? even better).
 Asura.Sechs
Offline
サーバ: Asura
Game: FFXI
user: Akumasama
Posts: 9876
By Asura.Sechs 2021-12-03 04:14:25  
I love the split setup approach, but you need very coordinated people, hopefully without mules or really good at multiboxing.

In my experience as long as everything flows fine, it's awesome!
But once a single small error happens (like a bad pull) then the group without a tank can be in a real mess, depending on the zone, the amount of statues pulled, the position, the type of mobs and many other aspects.
 Leviathan.Isiolia
Offline
サーバ: Leviathan
Game: FFXI
user: Isiolia
Posts: 458
By Leviathan.Isiolia 2021-12-03 08:09:57  
Cerberus.Kylos said: »
Statue Colours

San d'Oria - Blue eyes = Magic Weak / Green eyes = Physical Weak
Bastok - Blue eyes = Dark Weak / Green eyes = Light Weak
Windurst - Blue eyes = Reduced Physical Damage (-50%) / Green eyes = Reduced Ranged/Magic Damage (-33.3%)
Jeuno - Blue eyes = +50% DT, AoE's won't work / Green eyes = +20% DT and enfeebling (% Sleep) resistant

- Most groups bring Corsairs with Leaden Salute sets to deal with statues. They usually wait for Blue eyes, in order to kill in one shot, especially if the group is aiming for wave 3. If a statue dies in one blow, it will not spawn beastmen. Corsairs can sometimes suffer with resists, and Lightsday makes this more likely.

Beastmen

There's not much difference between regular monsters across all four zones. Statues are best taken down with magical damage and not melee'd on. Beastmen often should be targeted based on job. Something like this:

The way you've written this leads me to think that you assume the eye color pertains to the statues themselves. It doesn't. It changes the properties of the beastmen that statue spawns. Waiting on a favorable eye color before trying to one-shot still isn't a bad idea, but really just in case of a resist. It's more something that your tank should keep in mind when pulling, since they can significantly impact kill speed by playing to your group's strengths.


Wave 2 bosses are all greatly softened if you remember that defensive buffs exist. Plan to do a BRD swap, with SV/CC and all, with one set of songs being carols, minnes, enmity +/- and so on.
Having more modern sets with higher DEF/MEVA/etc helps a lot too.
Just in general, you can't get away with glass cannon mode on them.


As has been mentioned, if you are planning to do Wave 2 boss and beyond, you really want to bring along a good RDM.


Phoenix.Capuchin said: »
(b) for the love of god, don't fight WHM or COR adds until they are very safely separated from the boss (you don't want Benediction or Wild Card refiling the boss HP to 100%).

Benediction isn't an issue as it'll only restore 99k HP, which you'll wipe back out in a good WS or three.
[+]
 Bahamut.Suph
Offline
サーバ: Bahamut
Game: FFXI
user: Suph
Posts: 321
By Bahamut.Suph 2021-12-03 08:31:08  
If you're planning to one shot many many statues, this is what I do when I low man Statue Crusher+ Campaign in sandy.

Pop one of the statues that doesn't pop too many mobs, pop them blue eyes so you can one shot the mob that you don't want with leaden salute while your normal TP shot will do very little damage.

Keep one of the Orc as TP fodder pet (I usually rope in a pup to tank this pet). Shoot the Orc to get about 2000 TP before you leaden salute, that way even if you get 1/2 resist, you'll still kill the statue.
[+]
Offline
Posts: 164
By Spookyfish89 2021-12-03 08:31:30  
I generally get my group to head straight for W1/2 boss by keeping a mob alive for a TP battery for the COR/RNGs while the rest of the group clears around where we intend on killing the W2 boss, when aiming for W3 clear of course.

Bastok: We use the ramp closer to the mines, next to the W1 boss ramp. Tanks up against the stall to avoid knock-back, melee on his side with their backs up against the bottom ramp and mages/ranged up the ramp using the height/distance.

Windy: Boss/Tanks/Melee near where the Home Point would be in Windurst Walls and mages/ranged up on the bridge from the tower.

I'm usually on RDM myself and I've found to keep pulls smooth if you communicate with your tanks, you can be ready on pull to silence GEOs/BLUs/BLMs to avoid bubbles or unwanted spells from catching you off guard. (kind of a given but if you run with new people often or PUGs it could save you a headache)

There's a few pulls that could be problematic for new people like the circles at the Jeuno AH and entrance to the palace due to volte pathing, instead of pulling these to you just run through the mob set you're pulling while hugging the wall of the side you're pulling to avoid aggro.
 Shiva.Thorny
Offline
サーバ: Shiva
Game: FFXI
user: Rairin
Posts: 2075
By Shiva.Thorny 2021-12-03 09:42:14  
A tp limit method with shadows is very effective against all of the wave 2 bosses. You can clear any of them in sub-15 minutes with BRD RDM MNK/NIN COR. Stick your debuffs, white damage is your friend, nothing is going to one shot the MNK. RDM and BRD keep stoneskin up and a decent idle set, COR sits out of range except to roll and qd dia. You can use bind or gravity to kite thousand fists(the pillar between where bastok boss spawns and the mog house, as well as the fountain in sandoria, are both easy enough to kite without debuffs).

May not be practical for all groups/setups, other jobs can probably fill in as the DPS fine, though capped SB and minimal loss from /nin is nice. If you're running a huge group, you could send a smaller subset toward the boss while the rest farm. It's reminiscent of older ffxi where a smaller group has a much easier time.

Not the only way to skin the cat, of course, but something worth mentioning for groups that have been struggling with wave 2 bosses. When you throw 18 people at it, it has permanent TP and far more targets for every aoe, so you need proportional healing available. With higher debuff uptime it doesn't always end up significantly faster either.
 Bahamut.Suph
Offline
サーバ: Bahamut
Game: FFXI
user: Suph
Posts: 321
By Bahamut.Suph 2021-12-03 10:02:10  
Can also have Bard NiTro Lullaby the wave 2 boss for a min to interrupt a lot of their tp moves
[+]
 Bahamut.Shozokui
Offline
サーバ: Bahamut
Game: FFXI
user: Shozokui
Posts: 460
By Bahamut.Shozokui 2021-12-03 10:34:19  
How many people are in your group?

In my experience, the only things that can go wrong on the Wave 2 bosses are Missing defensive buffs, missing offensive buffs, missing critical debuffs, or ignoring the boss's "gotcha" ability.

These strats always work well in alliances of 10+ people, so they may not work amazing depending on your group comp and size. Both of which you've left out.

My DD parties are always set up like so:
2x DD, COR, BRD, GEO, WHM or SCH

Everyone always stacks in so WHMs can just spam curaga. Easy enough.

GEO: Barrier, Fury
BRD: (Always use a 2nd march if no RDM is present or bad haste maintenance)
- Halphas: HM, Minx3 or Minx2 + Etude depending on DD, Madrigal
- Bastok dude (Overcap haste since you won't have haste 2): HM, VM, Mad, Minx2
- Yagudo: HM, Minx3 or Minx2 + Etude depending on DD, Madrigal
COR: Crooked Chaos, Sam
WHM: Boost STR, Auspice
- Halphas - Barfira, Baramnesra
- Bastok dude: Barstonra, Barpetra
- Yagudo: Baraera, Barsilencera


Halphas:
- Don't get repulsor'd when he uses invincible
- Tank should use Battuta as much as possible to avoid hate reset. Run 2 tanks if possible, have them stand at a 45 degree angle to prevent both getting reset.
- If you get hate, move to the other side. Don't get the group bopped

Bastok guy:
- Knockbacks, knockbacks, knockbacks.I use the corner by the stables so people can get nuzzled in personally.
- Hit him from the side, can't hit him from the back
- Don't get reprisal'd

Yagudo:
- Knockbacks, knockbacks, knockbacks.
- Make sure every person has a requip macro that includes their weapons. They'll get knocked off randomly. Equipviewer is helpful, dressup is helpful
- Stymie silence him to avoid subsequent obnoxiousness
- Don't get leg swept to death


Wave 3 is a different beast. For circles, keep in mind that those mobs take a good amount of skillchain damage. It's worth it if your DPS are lacking.

Make sure you have HM, Madx2, Min at least, swap Min for VM if missing Haste II.

RDM is invaluable. Need to silence Blue Mages, Red Mages, and GEOs on pull. Prioritize distract after on NMs.

If you don't have a RDM, you'll have significantly less fun. Make your GEO run Precision/Torpor. Will 100% be required with all these kids using TP bonus offhands and DNC/THF NMs being highly evasive.

Kill things that charm last.
Always sleep avatars or bombs/clusters.
Expect that the Ninja NM is going to do 99k to your RUN every time and kill it last. Dumbest NM in the game.

Can't kill all the circles in time? Do like half of them, then sac pull some to make up time for the end boss.

End bosses are all the same. Debuff them, kill them. Anyone with a magic WS should get acumen/malaise and throw heat.
- Either don't kill corsairs or pull them away. They spawn with w/e enmity the person tanking has, so it can be hard to pull away. I recommend just not killing it
- Don't kill BST with 1 tank. Tank will almost certainly get charmed and lose all hate on the boss.
- Don't drag it out. The WS become AoE and get worse the longer you're fighting. Use all CDs and blow it up.
[+]
Offline
Posts: 254
By Mrgrim 2021-12-03 10:55:10  
HALPHAS

Man I hated halphas's constant hate reset and chase it around when it went after healers up the rampart. I just took it head on be4 I took a break from XI. I didn't have my brd availabe so a friend of mine brought his 3song brd, not the best but did what it had to do. At least he had a Marsyas. My setup was RUN, COR(Wiz/Sam), BRD, Idris GEO(Malaise/Acum/Entrust Barrier), SCH, RDM. We killed it with a combination of 4 step darkness SC along kaustra/dark helix combo. Basically RDM hasted and gave it its usual debuffs, brd did HM/Mad/Minnex2 during SV/CC and land Dark Threnody. Now for the 4 step it was (darkgambit) Leaden>Seraph>Leaden (land dark Rayke then hit with Ebullence Dark helix followed by impact from rdm) > Wildfire (hit it with kaustra on closing darkness).

IIRC Halphas went from 100% to 50% 1.5mins into fight and died 6-7mins after fight started of which he only did like 5-6 tp moves in total. For this to work you need to use a Orc commander as a tp battery. I think I used the ninja commander orc for this. It's a little risky if he blows up but I think he was at 50% hp by the time we defeated Halphas. I only did this once since sub ran out next day, but I'm sure it can be optimized and kill halphas in <5mins. Idling in -dt gear on geo and SCH and keeping shriek dispelled should keep them from getting 1 shot by that AoE. Another thing to note that this was done with latest bis r20 ody equip.
 Ragnarok.Lowen
Offline
サーバ: Ragnarok
Game: FFXI
user: Rorrick
Posts: 316
By Ragnarok.Lowen 2021-12-03 11:40:27  
If you're zerging Halphas (or the Yagudo), Intervene makes the last 50% a joke. Your two tanks (or your one tank and whichever DD is likely to be second on the hate list) need to stand in an L shape with Halphas so that they don't both get shoulder tackled and hate reset at the same time.

For the Quadav, just don't be behind it because you'll hit for 0. For the Yagudo, keep it silenced or you'll get obliterated by Dread Spikes.

The goblin is a joke.
[+]
 Cerberus.Kylos
Offline
サーバ: Cerberus
Game: FFXI
user: Kylos
Posts: 4295
By Cerberus.Kylos 2021-12-03 12:20:39  
Wow, this blew up nicely. I have a weekend free so I'll comb over this later. Would be great to bring all of this together in one place. By the way, my group is running with between 12-18 players, although one player multi boxes 4 characters and sometimes struggles to do everything. We have many people who are new to this, me included, so as the leader I'm doing what I have always done by leaving no stone unturned. And yes, we have a RDM, two brds, two cors, two geos, two tanks etc. Thanks guys.
Offline
Posts: 71
By dontclickme 2021-12-03 18:26:48  
did a quick glace through previous posts, so someone may have mentioned this. there's a ws damage reduction for repeatedly using the same ws on w2 bosses. so you'll want to offset damage penalties with alternate ws's.
 Cerberus.Kylos
Offline
サーバ: Cerberus
Game: FFXI
user: Kylos
Posts: 4295
By Cerberus.Kylos 2021-12-04 13:57:02  
I overhauled the statue colour & beastmen sections, although I would not say they are complete. If anyone would like to go through it to be sure nothing illogically slaps them in the face, that would be very helpful. Thank you.

Question: Why would a group prefer these carols in each zone? Do they make sense? (this is from the BGwiki guide)

Windurst- Wind Carol
San D- Thunder Carol
Bastok- Earth Carol
Jeuno- Light Carol
 Ragnarok.Lowen
Offline
サーバ: Ragnarok
Game: FFXI
user: Rorrick
Posts: 316
By Ragnarok.Lowen 2021-12-04 14:20:13  
I forget why people want Wind Carol for the yagudo, but Thunder Carol on Halphas is for the stun resistance, and Earth Carol on the Quadav for the petrify I think. No idea why Light on the Goblin.

Been a while since I've done Windy but I think Thunder Carol is just as valuable as Wind if not more, to mitigate the Leg Sweep spam from the Yagudo.
 Cerberus.Kylos
Offline
サーバ: Cerberus
Game: FFXI
user: Kylos
Posts: 4295
By Cerberus.Kylos 2021-12-04 15:26:21  
Ragnarok.Lowen said: »
I forget why people want Wind Carol for the yagudo, but Thunder Carol on Halphas is for the stun resistance, and Earth Carol on the Quadav for the petrify I think. No idea why Light on the Goblin.

Been a while since I've done Windy but I think Thunder Carol is just as valuable as Wind if not more, to mitigate the Leg Sweep spam from the Yagudo.

I just remembered these carols are meant for the zone bosses. Light Carol for Obstatrix? Wouldn't Fire Carol make more sense?
Offline
Posts: 14
By Titorinho 2021-12-04 15:51:38  
Light carol Reprisal spikes during invincble below 50%?
[+]
 Ragnarok.Lowen
Offline
サーバ: Ragnarok
Game: FFXI
user: Rorrick
Posts: 316
By Ragnarok.Lowen 2021-12-04 18:45:37  
Oh, yeah that's probably why. Fire Carol isn't helpful because you can't resist the plague aura.
 Asura.Houndsoflove
Offline
サーバ: Asura
Game: FFXI
user: Ephexis
Posts: 44
By Asura.Houndsoflove 2021-12-04 19:59:28  
Never used carols, just full zerg mode with splits. Rarely use a tank at all, although have had the luxury to following some recruits into my new LS.

WHM BRD COR DD DD DD
WHM GEO BRD TANK TANK RDM

That's the setup I'm using, and it's getting W3 success with a mixture of old and new players. Within a month of the LS starting, we're clearing on W3 for fun, with people who at the start of November hadn't even done Dynamis before.

The key really though is good communication throughout. The ability to make a decision, and deviate from the plan if something goes awry and react in the spur of the moment is the critical point. My group understand what they need to be doing though, because I will be giving direction throughout. Perhaps, and to be quite blunt with this, you need to communicate better. If I can teach around 10 complete novices in a month, not in optimal equipment etc, then really you should be doing better than that with an established group. I don't even force my guys to play specific jobs, I ask them at event time to send me a tell with whatever job they'd prefer to play on that day.

Have you run the stats to work out what is lacking? ACC/WSDMG parses can help in that. Nobody cares about the total damage, but you can use that information to find what the issue is and then find ways to work on it. Are you not already looking at that data? If not, why not? As a leader, you need to understand your group better than they understand theirselves and plan accordingly.

Are you constantly asking your group for feedback during the run? If there's an issue in one party, are you aware of it early or do you find out at the end, if ever?

As I said, I think a large volume of the issues you're experiencing are likely to be down to communication. Nail that, and results improve.
 Cerberus.Kylos
Offline
サーバ: Cerberus
Game: FFXI
user: Kylos
Posts: 4295
By Cerberus.Kylos 2021-12-04 21:44:27  
When you guys talk about the stalls for tanking wave 2 boss in Bastok, do you mean where the wheelbarrow is?

Edit: Nevermind! I'm guessing it's the example shown in this video @ 21:00

YouTube Video Placeholder
 Ragnarok.Lowen
Offline
サーバ: Ragnarok
Game: FFXI
user: Rorrick
Posts: 316
By Ragnarok.Lowen 2021-12-04 22:18:47  
No need to pull it across the zone, just fight it in a corner by the mog houses. Your tank can be up against one wall and your party can be on the side of it up against the other wall. Same setup as Halphas basically.
[+]
 Cerberus.Kylos
Offline
サーバ: Cerberus
Game: FFXI
user: Kylos
Posts: 4295
By Cerberus.Kylos 2021-12-04 22:34:31  
Ragnarok.Lowen said: »
No need to pull it across the zone, just fight it in a corner by the mog houses. Your tank can be up against one wall and your party can be on the side of it up against the other wall. Same setup as Halphas basically.

Yes that's how my group did it, we got in the corner at the Mog House. Others suggested a spot at the stables.

Ok, so I'm looking through some of the wave 2 boss notes. When do you decide to use Etude over a Minuet?

Also, one thing I noticed about Halphas. We tanked it between the stalls, and it sometimes headed off toward the healers who were above. We only had myself on Rune and a PUP auto, and as our first wave 2 boss we had no idea if we could beat it. I'm guessing this was the main reason, because you need two tanks getting significant hate so it doesn't think about leaving the group.

Edit: Something I should point out, is that my group does not have 3 brds and two DD parties, yet we're still making it to wave 3. It's tougher, but we're doing it. To be honest, we're two small linkshells coming together, so we're still learning to be a tight group. Before that, we just farmed wave 1&2 separately. I'm leading while serving as the main tank, which isn't ideal, but is the only option for now. We're figuring this out without the luxury of brute force. It's a matter of experience and me getting educated, so I can educate them. We only do this once a week, so it may take longer to adapt, compared to those who go twice on top of doing other events together. Also, being on the smallest server means we can't easily recruit from /yell or asking around. Most of the experienced players already have their own groups.
Offline
Posts: 81
By Seraphpdh 2021-12-04 23:45:14  
Cerberus.Kylos said: »
Also, one thing I noticed about Halphas. We tanked it between the stalls, and it sometimes headed off toward the healers who were above. We only had myself on Rune and a PUP auto, and as our first wave 2 boss we had no idea if we could beat it. I'm guessing this was the main reason, because you need two tanks getting significant hate so it doesn't think about leaving the group.
I'm not sure which, but one of its moves seems to be a full hate reset, so having two tanks is advised since it's far more unlikely he will do resets back to back.
 Cerberus.Kylos
Offline
サーバ: Cerberus
Game: FFXI
user: Kylos
Posts: 4295
By Cerberus.Kylos 2021-12-04 23:59:30  
Seraphpdh said: »
Cerberus.Kylos said: »
Also, one thing I noticed about Halphas. We tanked it between the stalls, and it sometimes headed off toward the healers who were above. We only had myself on Rune and a PUP auto, and as our first wave 2 boss we had no idea if we could beat it. I'm guessing this was the main reason, because you need two tanks getting significant hate so it doesn't think about leaving the group.
I'm not sure which, but one of its moves seems to be a full hate reset, so having two tanks is advised since it's far more unlikely he will do resets back to back.

Yes, it's Full-On Tackle.

On to something else, I'm wondering if Armor Break/Tachi Ageha works like Full Break on Ka'Rho Fearsinger? It has been said that Full Break negates its Shell Guard move, but do the stronger debuffs work the same? Would it not make sense to Weapon Break & Armor Break/Ageha (25% atk/def down), than using Full Break (12.5% atk/def down)?

After looking at each WS, I'm guessing it's because of duration? You'd rather have a 12-minute window to kill Fearsinger without Shell Guard, than have to keep up Armor Break in 9-minute intervals?

I've added some universal Zone Boss buffs/debuffs for common jobs before we get more specific. Please let me know if there should be anything else thrown in there, thanks.
First Page 2 3
Log in to post.