Since more and more people are building mythics now and a lot of people have been asking how to efficiently farm ZNM's, I decided to put together this guide to help.
A quick background from wiki:
Zeni Notorious Monsters are spawned by trading a pop item to ??? around Aht Urhgan. The pop items are obtained from Sanraku at (E-8) in Aht Urhgan Whitegate in exchange for zeni. When spawned, the pop item is lost and the monster appears. A full alliance of 18 can engage these ZNMs using one pop item. These are normal battles, not battlefields.
The amount of zeni that a pop item costs varies with level of demand (a player purchasing a pop item will cause its price to rise by 100 zeni, and it will gradually drop back down over time) and with the tier of ZNM (higher tiers cost more zeni). Following a server maintenance, the price for all pop items is set to minimum.
After defeating a ZNM, a "trophy" item bearing the defeated ZNM's name is dropped. It can be taken back to Sanraku, who will give you a colored seal key item in return. The seals allow the bearer one chance at purchasing a higher tier item (zeni is still required for purchase). These are temporary key items and once you purchase a pop item from Sanraku for a higher tier ZNM, the lower tier seal is lost. For example: If you kill Cheese Hoarder Gigiroon in Tier 1 you will get a Key Item Maroon Seal upon turning in Gigiroon's Cape; now you want to kill Iriz Ima in Tier 2. As soon as you purchase the pop item for Iriz Ima your KeyItemMaroon Seal will be lost. In order to purchase another, you must turn in another trophy item that bestows a Key Item Maroon Seal.
Farming Zeni
From Wiki:
Zeni is obtained by trading in Soul Plates to Sanraku, who is located at (E-8) in Aht Urhgan Whitegate. To obtain Soul Plates, you need Blank Soul Plates and a Soultrapper, both of which can be purchased from Zandjarl, located at (F-7) in The Colosseum, in exchange for Jettons (Zandarl exchanges imperial currency for jettons as well).
I've found the Naul in Abyssea- Tahrongi provide the best return for soul plates. They are located SW of flux # 3. Trading these soul plates to Sanraku can give around 1500 zeni each. Make sure you are standing directly in front of them at about 3' away
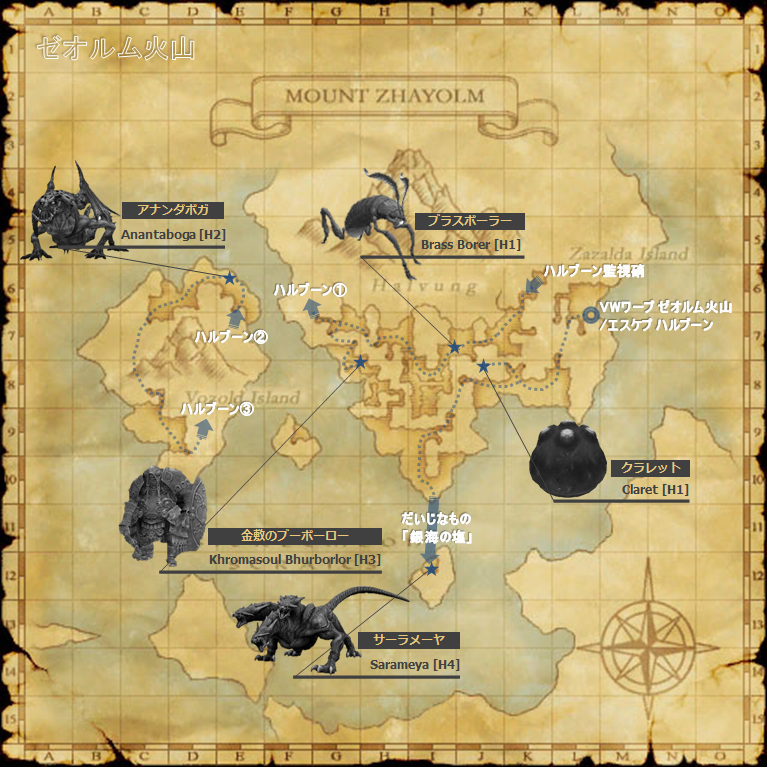
ZNM Efficient Kill Path
Below I've found to be the most efficient kill path. I recommend setting your home point to the Aht Urghan #4 HP crystal by the mog house.
The ??? takes 3 minutes between kills to repop if you're going with other people/mules to farm multiple PW pops at once- remember to save the additional T4 pops for your lvl 90 trial before converting them to PW Keys! Thanks to the Saitahiraita Blog for the maps
Grab T1 pops for Brass Borer and Claret and head out to the Halvung Staging Point to get started
| Step | Path Tier | NM Name | Result | Trade for Pop Item: |
| 1 | Troll T1 | Brass Borer | Troll T2 | Anantaboga |
| 2 | Troll T1 | Claret | Troll T2 | Dextrose |
Head back to Sanraku and trade the Brass Borer Cocoon and Claret Gobule for the next set of pops:
| Step | Path Tier | NM Name | Result | Trade for Pop Item: |
| 3 | Troll T1 | Brass Borer | Troll T2 | Anantaboga |
| 4 | Troll T2 | Anantaboga | Troll T3 | Khromasoul Bhurbular |
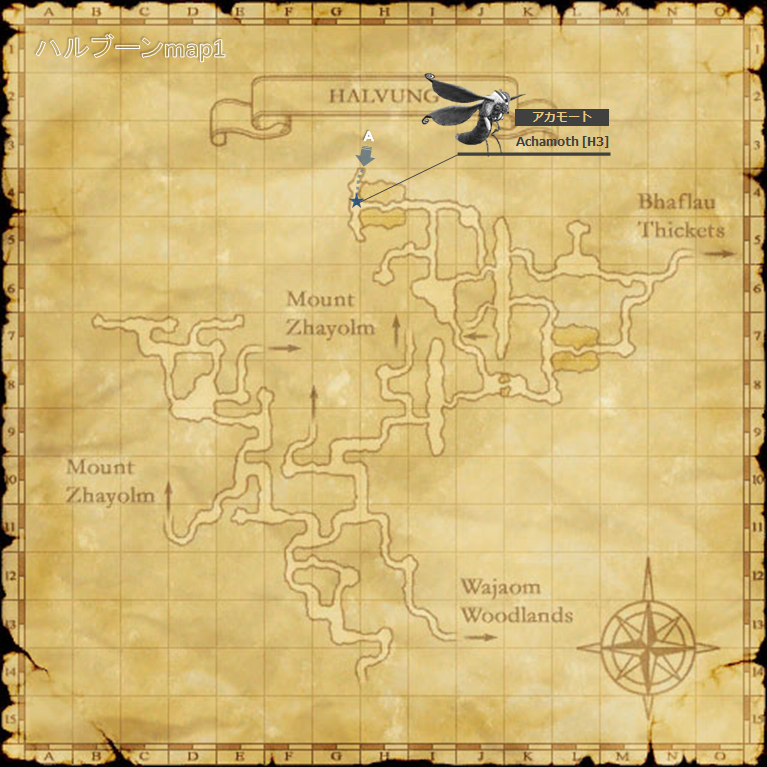
| 5 | Troll T2 | Dextrose | Troll T3 | Achamoth |
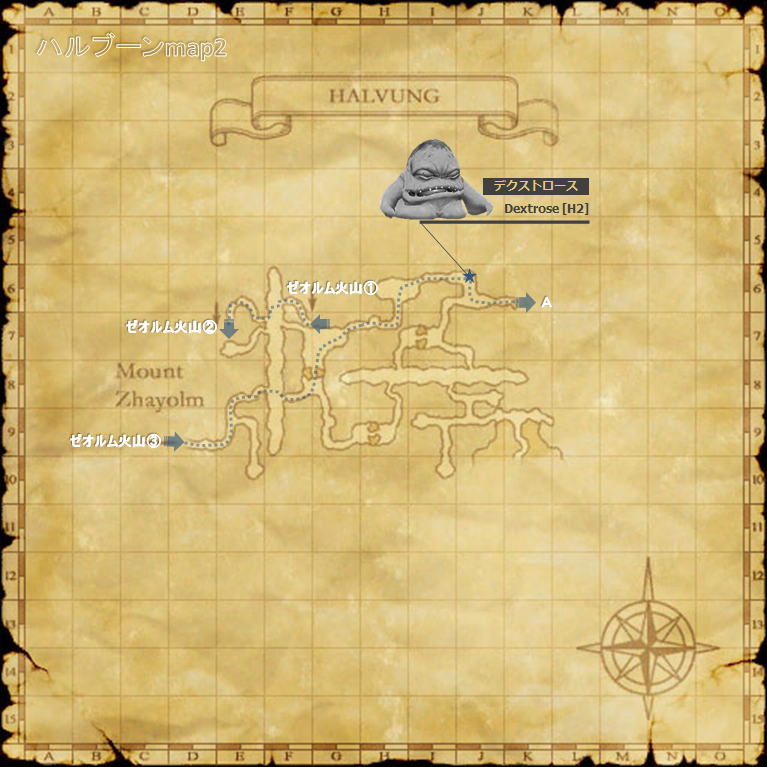
Anantaboga can use Maiden's Virelai- although it will most likely be fully resisted with iLvl gear. Travel all the way south on Vozold Isle to get to map 2 Halvung and pop Dextrose. You'll need a Bracelet of Verve KI if soloing or low-manning this.
| Step | Path Tier | NM Name | Result | Trade for Pop Item: |
| 6 | Troll T3 | Khromasoul Bhurbular | Troll T4A | Sarameya |
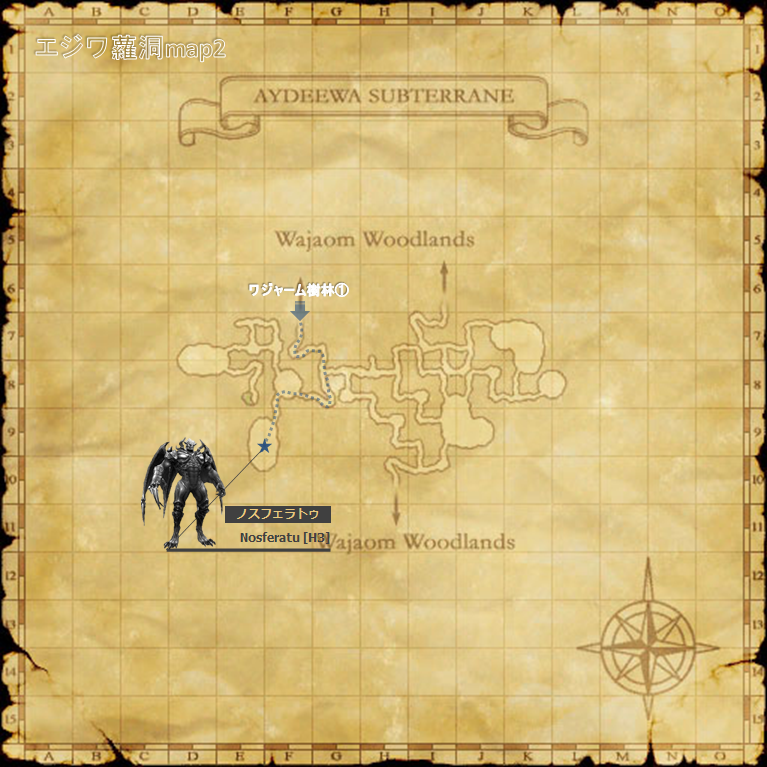
| 7 | Troll T2 | Anantaboga | Troll T3 | Nosferatu |
| 8 | Troll T3 | Achamoth | Troll T4B | Sarameya |
Achamoth is found just past the Dextrose pop area after you fall down the ledge on map 2
| Step | Path Tier | NM Name | Result | Trade for Pop Item: |
| 9 | Troll T3 | Nosferatu | Troll T4C | Sarameya |
| 10 | Lamia T1 | Chigre | Lamia T2 | Verdelet/Wulgaru |
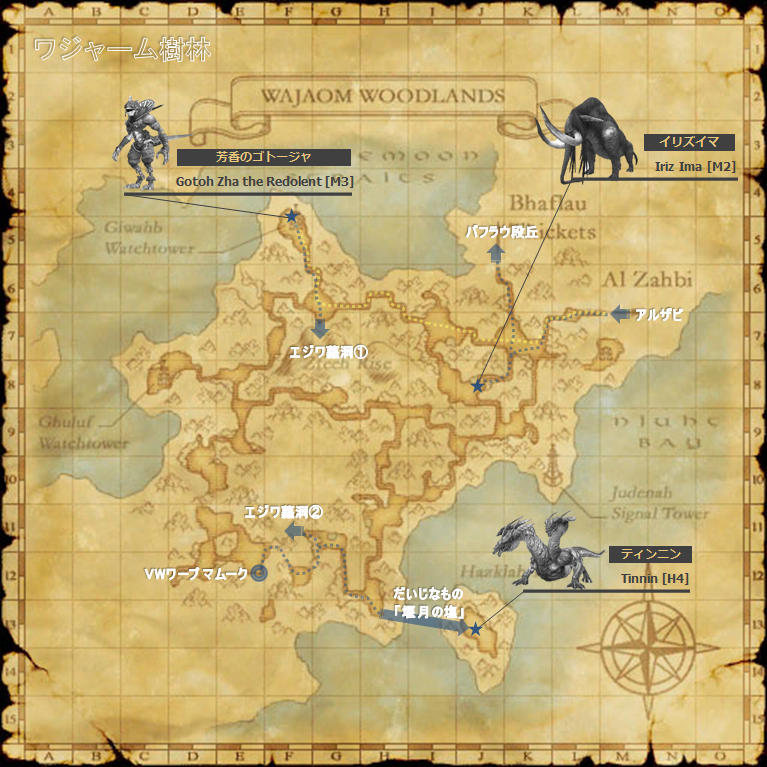
The entrance to this map of Aydeewa Subterrane is at G7 in Wajaom Woodlands. Chigre is found at E8 on the same map above
*Nosferatu has an extremely potent Dread Spikes to watch out for which can kill even a 119 player. Nocturnal Servitude is a charm effect and Eternal Damnation is doom, both of which will most likely be resisted at 119.
| Step | Path Tier | NM Name | Result | Trade for Pop Item: |
| 11 | Troll T4 | Sarameya | PW A | Pandemonium Warden |
Purchase a Silver Sea Salt KI from Sanraku prior to heading out to Halvung Staging Point
| Step | Path Tier | NM Name | Result | Trade for Pop Item: |
| 12 | Lamia T2 | Verdelet/Wulgaru | Lamia T3 | Nuhn |
This can be either Verdelet or Wulgaru, it really doesn't matter.
| Step | Path Tier | NM Name | Result | Trade for Pop Item: |
| 13 | Lamia T1 | Chigre | Lamia T2 | Wulgaru |
| Step | Path Tier | NM Name | Result | Trade for Pop Item: |
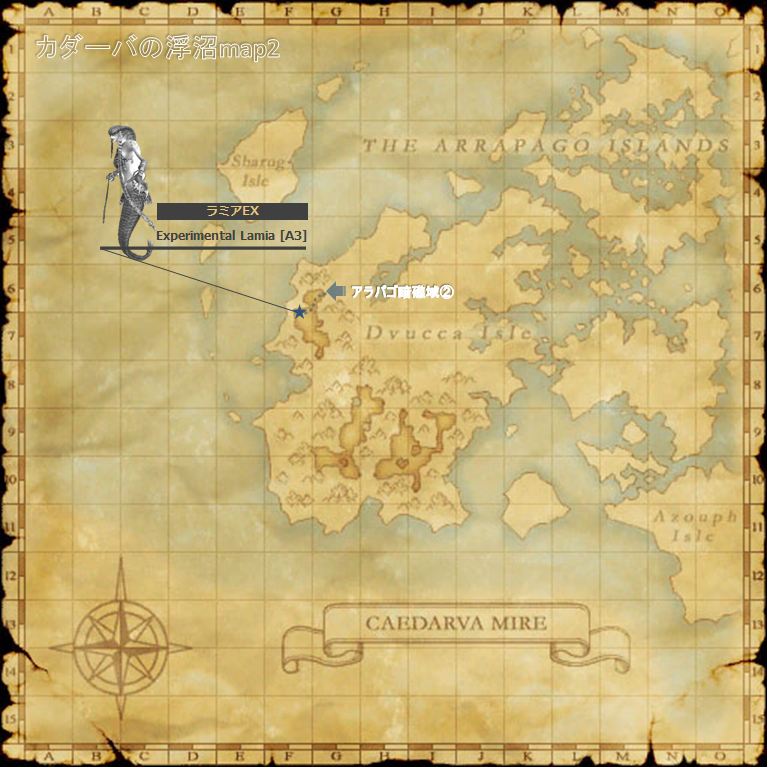
| 14 | Lamia T2 | Wulgaru | Lamia T3 | Experimental Lamia |
| 15 | Mamool T1 | Cheese Hoarder Gigiroon | Mamool T2 | Iriz Ima |
Next it's time to head out to Azouph Isle Staging Point for the trek through Arrapago Reef
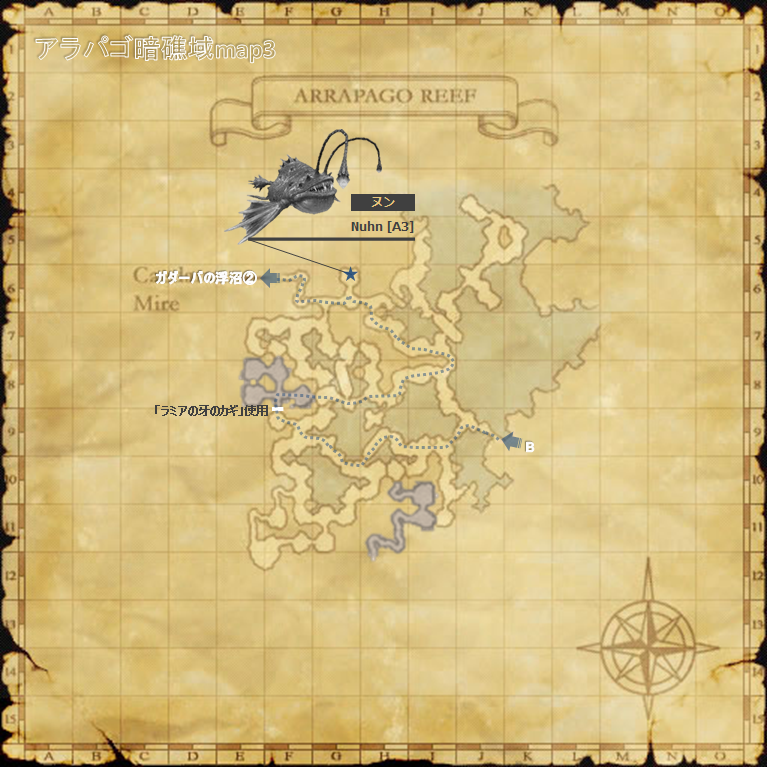
From Azouph Isle Staging Point, head to I-7, in Caedarva Mire. There is a swamp with a ??? behind a Jnun that will give you a free Lamian Fang Key which you will need for a locked door in Arrapago. These keys can also be farmed from the merrows and draugars in the Reef. Zone into Arrapago at I-6 in Caedarva
| Step | Path Tier | NM Name | Result | Trade for Pop Item: |
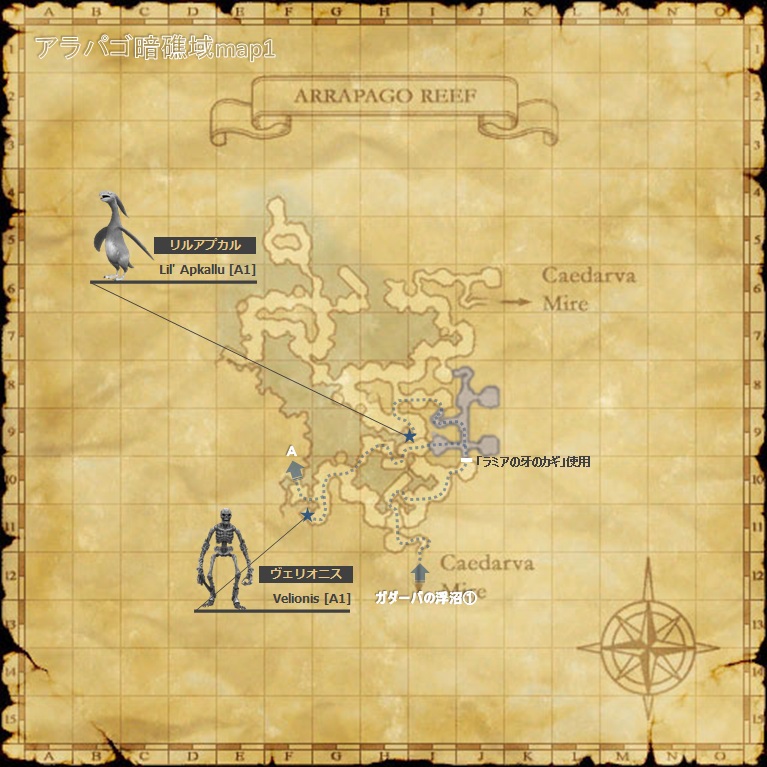
| 16 | Lamia T1 | Lil Apkallu/Velionis | Lamia T2 | Wulgaru |
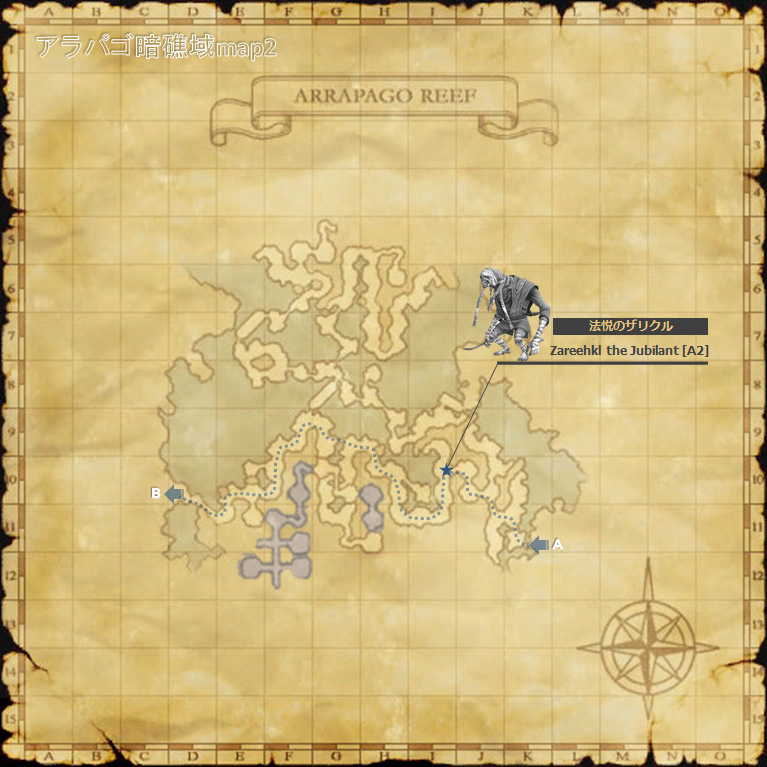
| 17 | Lamia T3 | Nuhn | Lamia T4A | Tyger |
| 18 | Lamia T3 | Experimental Lamia | Lamia T4B | Tyger |
| Step | Path Tier | NM Name | Result | Trade for Pop Item: |
| 19 | Mamoool T2 | Iriz Ima | Troll T3 | Dea |
Iriz Ima is a quick chocobo ride away from Al Zahbi
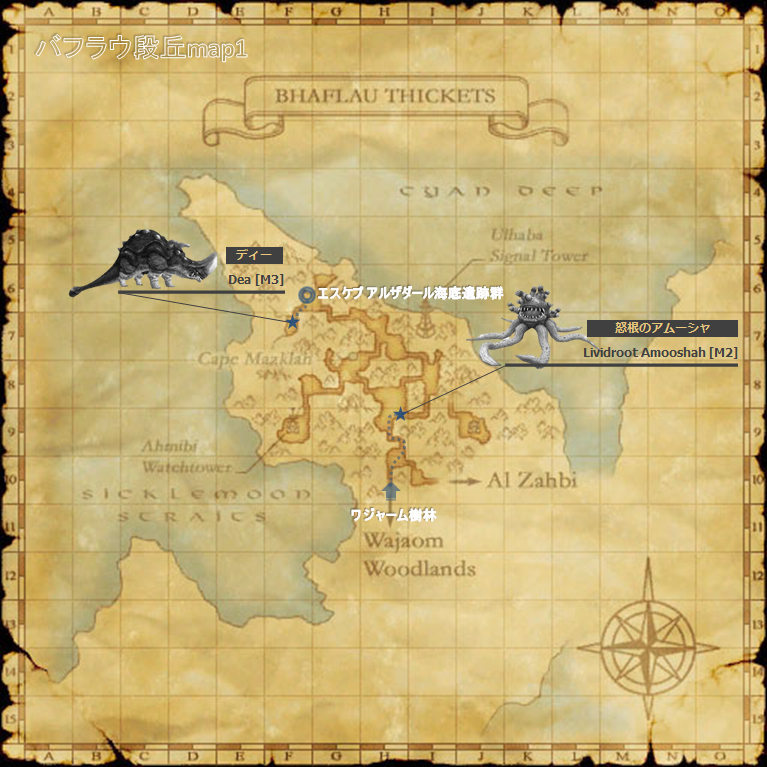
Head to Nyzul Isle Staging Point first to kill Wulgaru and Cheese Hoarder and then use Escape to end up near Dea's pop in Bhaflau Thickets
| Step | Path Tier | NM Name | Result | Trade for Pop Item: |
| 20 | Lamia T2 | Wulgaru | Lamia T3 | Mahjaef the Paintorn |
| 21 | Mamool T1 | Cheese Hoarder Gigiroon | Mamool T2 | Iriz Ima |
| 22 | Mamool T3 | Dea | Mamool T4A | Tinnin |
| Step | Path Tier | NM Name | Result | Trade for Pop Item: |
| 23 | Mamoool T2 | Iriz Ima | Mamool T3 | Armed Gears |
Before heading out to Nyzul Isle Staging Point, switching to a job that can use Requiescat will be extremely helpful for the next couple NMs
| Step | Path Tier | NM Name | Result | Trade for Pop Item: |
| 24 | Mamool T3 | Armed Gears | Mamool T4B | Tinnin |
| 25 | Mamool T1 | Cheese Hoarder Gigiroon | Mamool T3 | Gotoh Zha the Redolent |
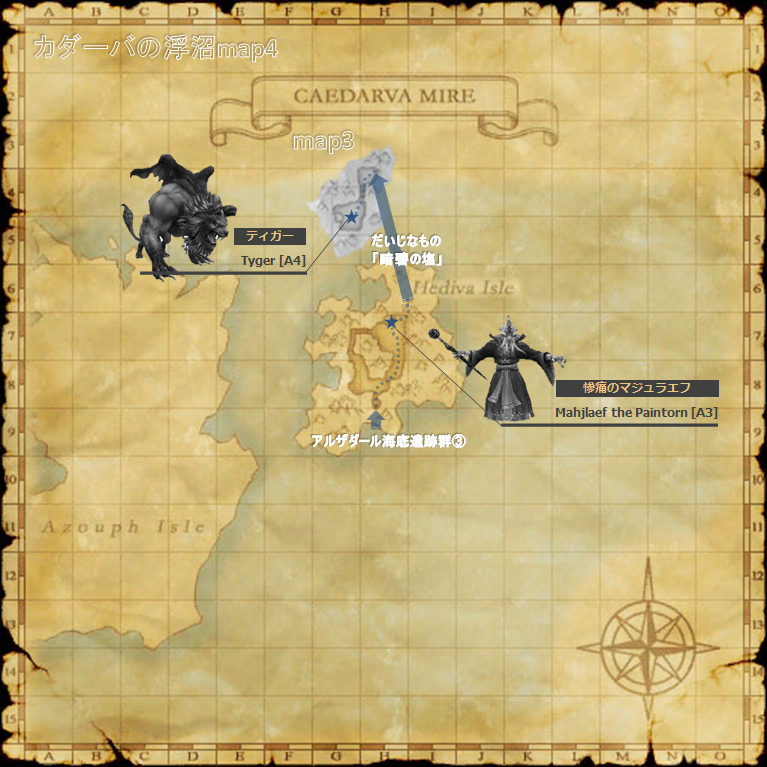
| 26 | Lamia T3 | Mahjaef the Paintorn | Lamia T4C | Tyger |
Mahjaef can be reached by going to the H8 portal in Alzaadal Undersea Ruins, (the NW portal in Nyzul) then take the east portal to zone out to Caedarva Mire Hediva Isle
*Armed Gears has an extremely high PDT but using Requiescat will make quick work of it.
*Mahjaef also has a very high PDT after he uses Immortal Shield that can be bypassed with Requiescat
| Step | Path Tier | NM Name | Result | Trade for Pop Item: |
| 27 | Lamia T4 | Tyger | PW B | Pandemonium Warden |
Purchase a Cyan Deep Salt KI from Sanraku prior to heading out to Tyger. Follow the same route to get to Mahjaef in Caedarva Mire Hediva Isle and go further NE on the map
| Step | Path Tier | NM Name | Result | Trade for Pop Item: |
| 28 | Mamoool T2 | Iriz Ima | Mamool T3 | Gotoh Zha the Redolent |
| Step | Path Tier | NM Name | Result | Trade for Pop Item: |
| 29 | Mamoool T3 | Gotoh Zha the Redolent | Mamool T4C | Tinnin |
| Step | Path Tier | NM Name | Result | Trade for Pop Item: |
| 30 | Mamoool T4 | Tinnin | PW C | Pandemonium Warden |
Purchase a Sicklemoon Salt KI from Sanraku prior to chocoboing out to Wajaom Woodlands H-13
Tinnin starts out with only 1 head and will periodically respawn another head. He can't be killed until all 3 heads have been regenerated
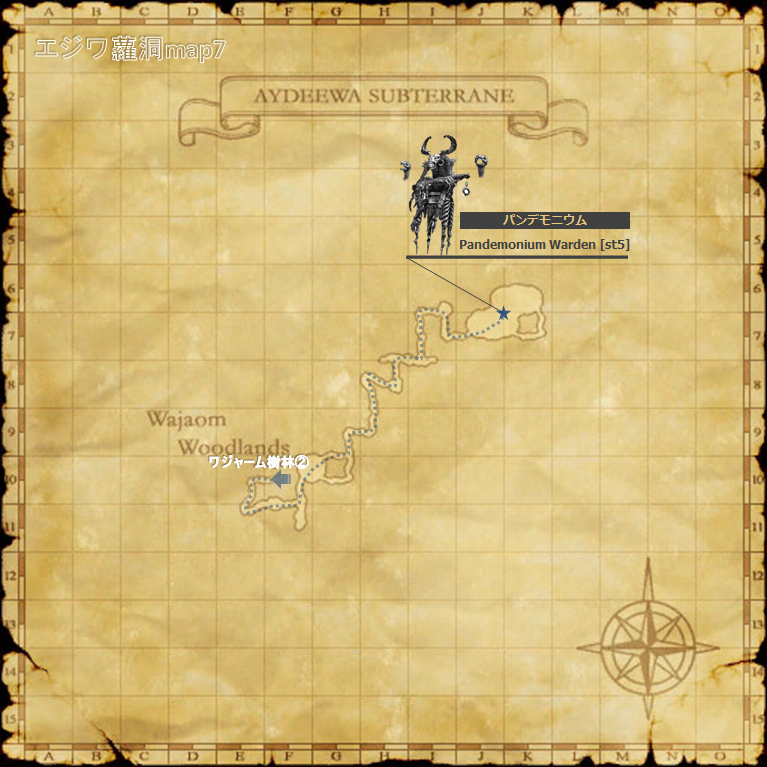
To get to Pandemonium Warden, zone into Aydeewa Subterrane from Wajaom Woodlands F-11.
He has 11 forms, starting with each of the 4 Salvage I chariot bosses, then the 3 TOAU kings and finally the 3 ZNM bosses. Once you kill one form he will move onto the next, ending with his final Dvergar form. Each form only has about 10k-20k hp so can be killed quickly. However, there are a few forms that can be dangerous if not killed fast enough:
Battleclad Chariot- can use Discoid which acts as a 10k needles. MDT reduces this damage taken but can be deadly for low man groups and will kill trusts (except moogle)
Long Armed Chariot- can use Brainjack which is single target charm
His final form is the most dangerous. At 75%, 50% and 25% all his lamps turn into avatars and Astral Flow. If you do not have enough damage, a good measure to mitigate some of the damage is to spread out all support/mules 30' a part- they will draw some of the avatars away so that all players will take reduced astral flows. A fast zerg taking him from 100% to 0 is the most effective
Below is the full path for ZNM's:
| Step | Path Tier | NM Name | Result | Trade for Pop Item: |
| 1 | Troll T1 | Brass Borer | Troll T2 | Anantaboga |
| 2 | Troll T1 | Claret | Troll T2 | Dextrose |
| - | - | - | - | - |
| 3 | Troll T1 | Brass Borer | Troll T2 | Anantaboga |
| 4 | Troll T2 | Anantaboga | Troll T3 | Khromasoul Bhurbular |
| 5 | Troll T2 | Dextrose | Troll T3 | Achamoth |
| - | - | - | - | - |
| 6 | Troll T3 | Khromasoul Bhurbular | Troll T4A | Sarameya |
| 7 | Troll T2 | Anantaboga | Troll T3 | Nosferatu |
| 8 | Troll T3 | Achamoth | Troll T4B | Sarameya |
| - | - | - | - | - |
| 9 | Troll T3 | Nosferatu | Troll T4C | Sarameya |
| 10 | Lamia T1 | Chigre | Lamia T2 | Verdelet/Wulgaru |
| - | - | - | - | - |
| 11 | Troll T4 | Sarameya | PW A | Pandemonium Warden |
| - | - | - | - | - |
| 12 | Lamia T2 | Verdelet/Wulgaru | Lamia T3 | Nuhn |
| - | - | - | - | - |
| 13 | Lamia T1 | Chigre | Lamia T2 | Wulgaru |
| - | - | - | - | - |
| 14 | Lamia T2 | Wulgaru | Lamia T3 | Experimental Lamia |
| 15 | Mamool T1 | Cheese Hoarder Gigiroon | Mamool T2 | Iriz Ima |
| - | - | - | - | - |
| 16 | Lamia T1 | Lil Apkallu/Velionis | Lamia T2 | Wulgaru |
| 17 | Lamia T3 | Nuhn | Lamia T4A | Tyger |
| 18 | Lamia T3 | Experimental Lamia | Lamia T4B | Tyger |
| - | - | - | - | - |
| 19 | Mamoool T2 | Iriz Ima | Troll T3 | Dea |
| - | - | - | - | - |
| 20 | Lamia T2 | Wulgaru | Lamia T3 | Mahjaef the Paintorn |
| 21 | Mamool T1 | Cheese Hoarder Gigiroon | Mamool T2 | Iriz Ima |
| 22 | Mamool T3 | Dea | Mamool T4A | Tinnin |
| - | - | - | - | - |
| 23 | Mamoool T2 | Iriz Ima | Mamool T3 | Armed Gears |
| - | - | - | - | - |
| 24 | Mamool T3 | Armed Gears | Mamool T4B | Tinnin |
| 25 | Mamool T1 | Cheese Hoarder Gigiroon | Mamool T3 | Gotoh Zha the Redolent |
| 26 | Lamia T3 | Mahjaef the Paintorn | Lamia T4C | Tyger |
| - | - | - | - | - |
| 27 | Lamia T4 | Tyger | PW B | Pandemonium Warden |
| - | - | - | - | - |
| 28 | Mamoool T2 | Iriz Ima | Mamool T3 | Gotoh Zha the Redolent |
| - | - | - | - | - |
| 29 | Mamoool T3 | Gotoh Zha the Redolent | Mamool T4C | Tinnin |
| - | - | - | - | - |
| 30 | Mamoool T4 | Tinnin | PW C | Pandemonium Warden |